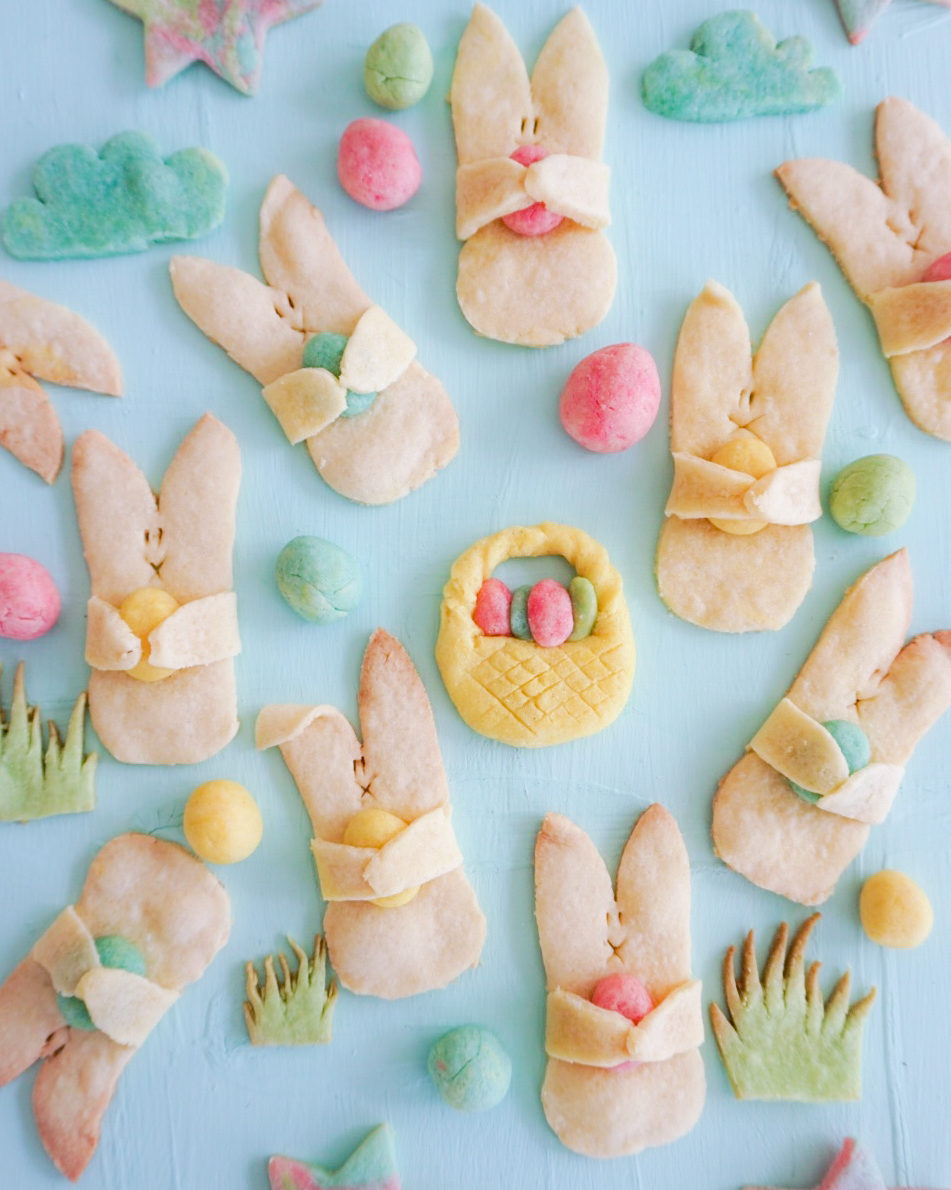
Bunny cookies
These crispy lemon cookies are gluten free, contain little sugar and are easy to make. They are not only great for Easter, but year around. Cuteness overload!
Equipment
- A ruler, a piece of paper and a pair of scissors to make the bunny mold.
- A rolling pin
- A cookie sheet and parchment paper
Ingredients
- 300 grams organic unrefined sugar ((= approx. 1¼ cups) or you can even use Stevia or Xylitol if you want to stay away from sugar (use a bit more though 320 grams/ 1½ cup))
- 170 grams butter (=approx. ¾ cup)(or sub vegan butter or margarine)
- 2 small eggs
- 2 tsp lemon zest (from the same lemon as the juice)
- 1½ tbsp lemon juice (from the same lemon as the zest)
- ½ tsp fine grain sea salt
- 2 tsp pure vanilla extract
- 360 grams gluten free all purpose flour (=approx. 3 cups)(plus more for dusting)(or sub regular AP flour)
- 1 tsp xanthum gum (if your GF flour doesn't contain it already!)
- a few drops natural food coloring (use only 1 or 2 drops of each color. I used yellow, red and blue, but you can use others and/or add 1 more color)
Instructions
Bunny mold:
- Draw and cut out a bunny to use as a mold. See my example in the text above.
Cookie dough:
- In a medium mixing bowl whisk together butter and sugar. Once creamy, add eggs, lemon juice and zest, vanilla and salt. Whisk until combined. Now add flour. Use a wooden spoon to mix it all together.
Adding food coloring and refrigerating the dough balls:
- Divide the dough in half. Cover one half with plastic foil and immediately refrigerate it. Divide the other half in 3 equal parts (or 4 if you want to add another color) and place them in different (small) mixing bowls. To each dough ball add one or two drops of (natural) food coloring and mix it well.Wrap each ball in plastic and refrigerate for about 30 minutes (longer is even better!).
- Preheat the oven to 350F/175C and line a cookie sheet with parchment paper.
Cutting out bunnies:
- Onto a lightly floured surface, roll out half of the dough to a ¼ inch thickness (the one without food coloring). Once the dough has been rolled out, cut out the bunnies by placing your homemade paper mold on the dough and tracing it with a sharp knife.Carefully transfer each cut-out bunny with a spatula to the lined cookie sheet. Use a sharp knife to cut out the nose and eyes on each bunny cookie.
Colored Easter eggs:
- Roll little egg-shaped balls from the colored doughs, place one on each bunny cookie and fold the arms over like it is holding an Easter egg.
Bake the bunnies!
- Slide the cookie sheet in the oven and bake them for 10-12 minutes in the preheated oven. Since these are thin sugar cookies you really have to keep an eye on them; they turn dark on the edges very quickly!After taking the out of the oven, let them cool off for 5-10 minutes before transferring them to a cooling rack. They will firm up when they cool off, so let them cool off completely before transferring them to a serving platter.
Notes
Nutritional information:
the information shown is an estimate provided by an online nutrition calculator. It should not be considered a substitute for a professional nutritionist's advice.